Good news: it's easier than it sounds. You don't need IT knowledge, a technician, or any special hardware. In this article, we'll walk you through step by step how to set up a tablet as a permanent point-of-sale system — so it just works and nobody accidentally navigates away or misconfigures anything.
What You Need — and What You Don't
Let's start with the good news: the list is short.
What you need:
- A tablet (Android or iPad) — new or used, a cheap one works perfectly fine
- Wi-Fi access in the room
- A mount or stand for the tablet
- A free account at Tapper
What you don't need:
- Any technical knowledge
- An app from the App Store
- A separate computer or server
- Individual accounts for each member
Tapper runs as a web app directly in the browser. No download, no installation, no update headaches. You open a website — and that's it.
Step 1: Set Up Tapper (15–20 Minutes)
Before the tablet goes on the wall, quickly set up Tapper. It's best to do this on your regular computer or laptop — easier to see everything.
1.1 Create a team
Go to tapper.team and create a new team. Give it a team name — e.g., "Office Kitchen Design Dept." or "Club Room TSV Springfield" — and you're done.
1.2 Add products
Now add what's in your fridge or storage area. For each product you only need two things: a name and a price. Optionally you can upload a photo — it makes it easier to tap the right thing in the kiosk later.
A few examples:
- Water 0.5l → $0.50
- Sparkling water → $0.80
- Coffee → $0.30
- Snickers → $0.80
1.3 Add members
Every person who should be able to log purchases gets an entry — first and last name is enough. No email account, no password, no login required for members. They simply tap their name in the kiosk.
1.4 Set up the kiosk account
This is the key step: to keep the tablet permanently running in kiosk mode, you set up a separate kiosk account. You'll need an email address for this — for example kiosk@yourteam.com or simply an existing address you use for this purpose.
In the admin area under "Members," you'll find the option "Set Kiosk Account." Enter the email, set a password, and log in with it on the tablet.
The kiosk account can only log purchases and submit top-up requests — it has no access to settings or statistics. That's exactly as it should be.
Step 2: Prepare the Tablet
Now it's the tablet's turn.
2.1 Open the browser and log in
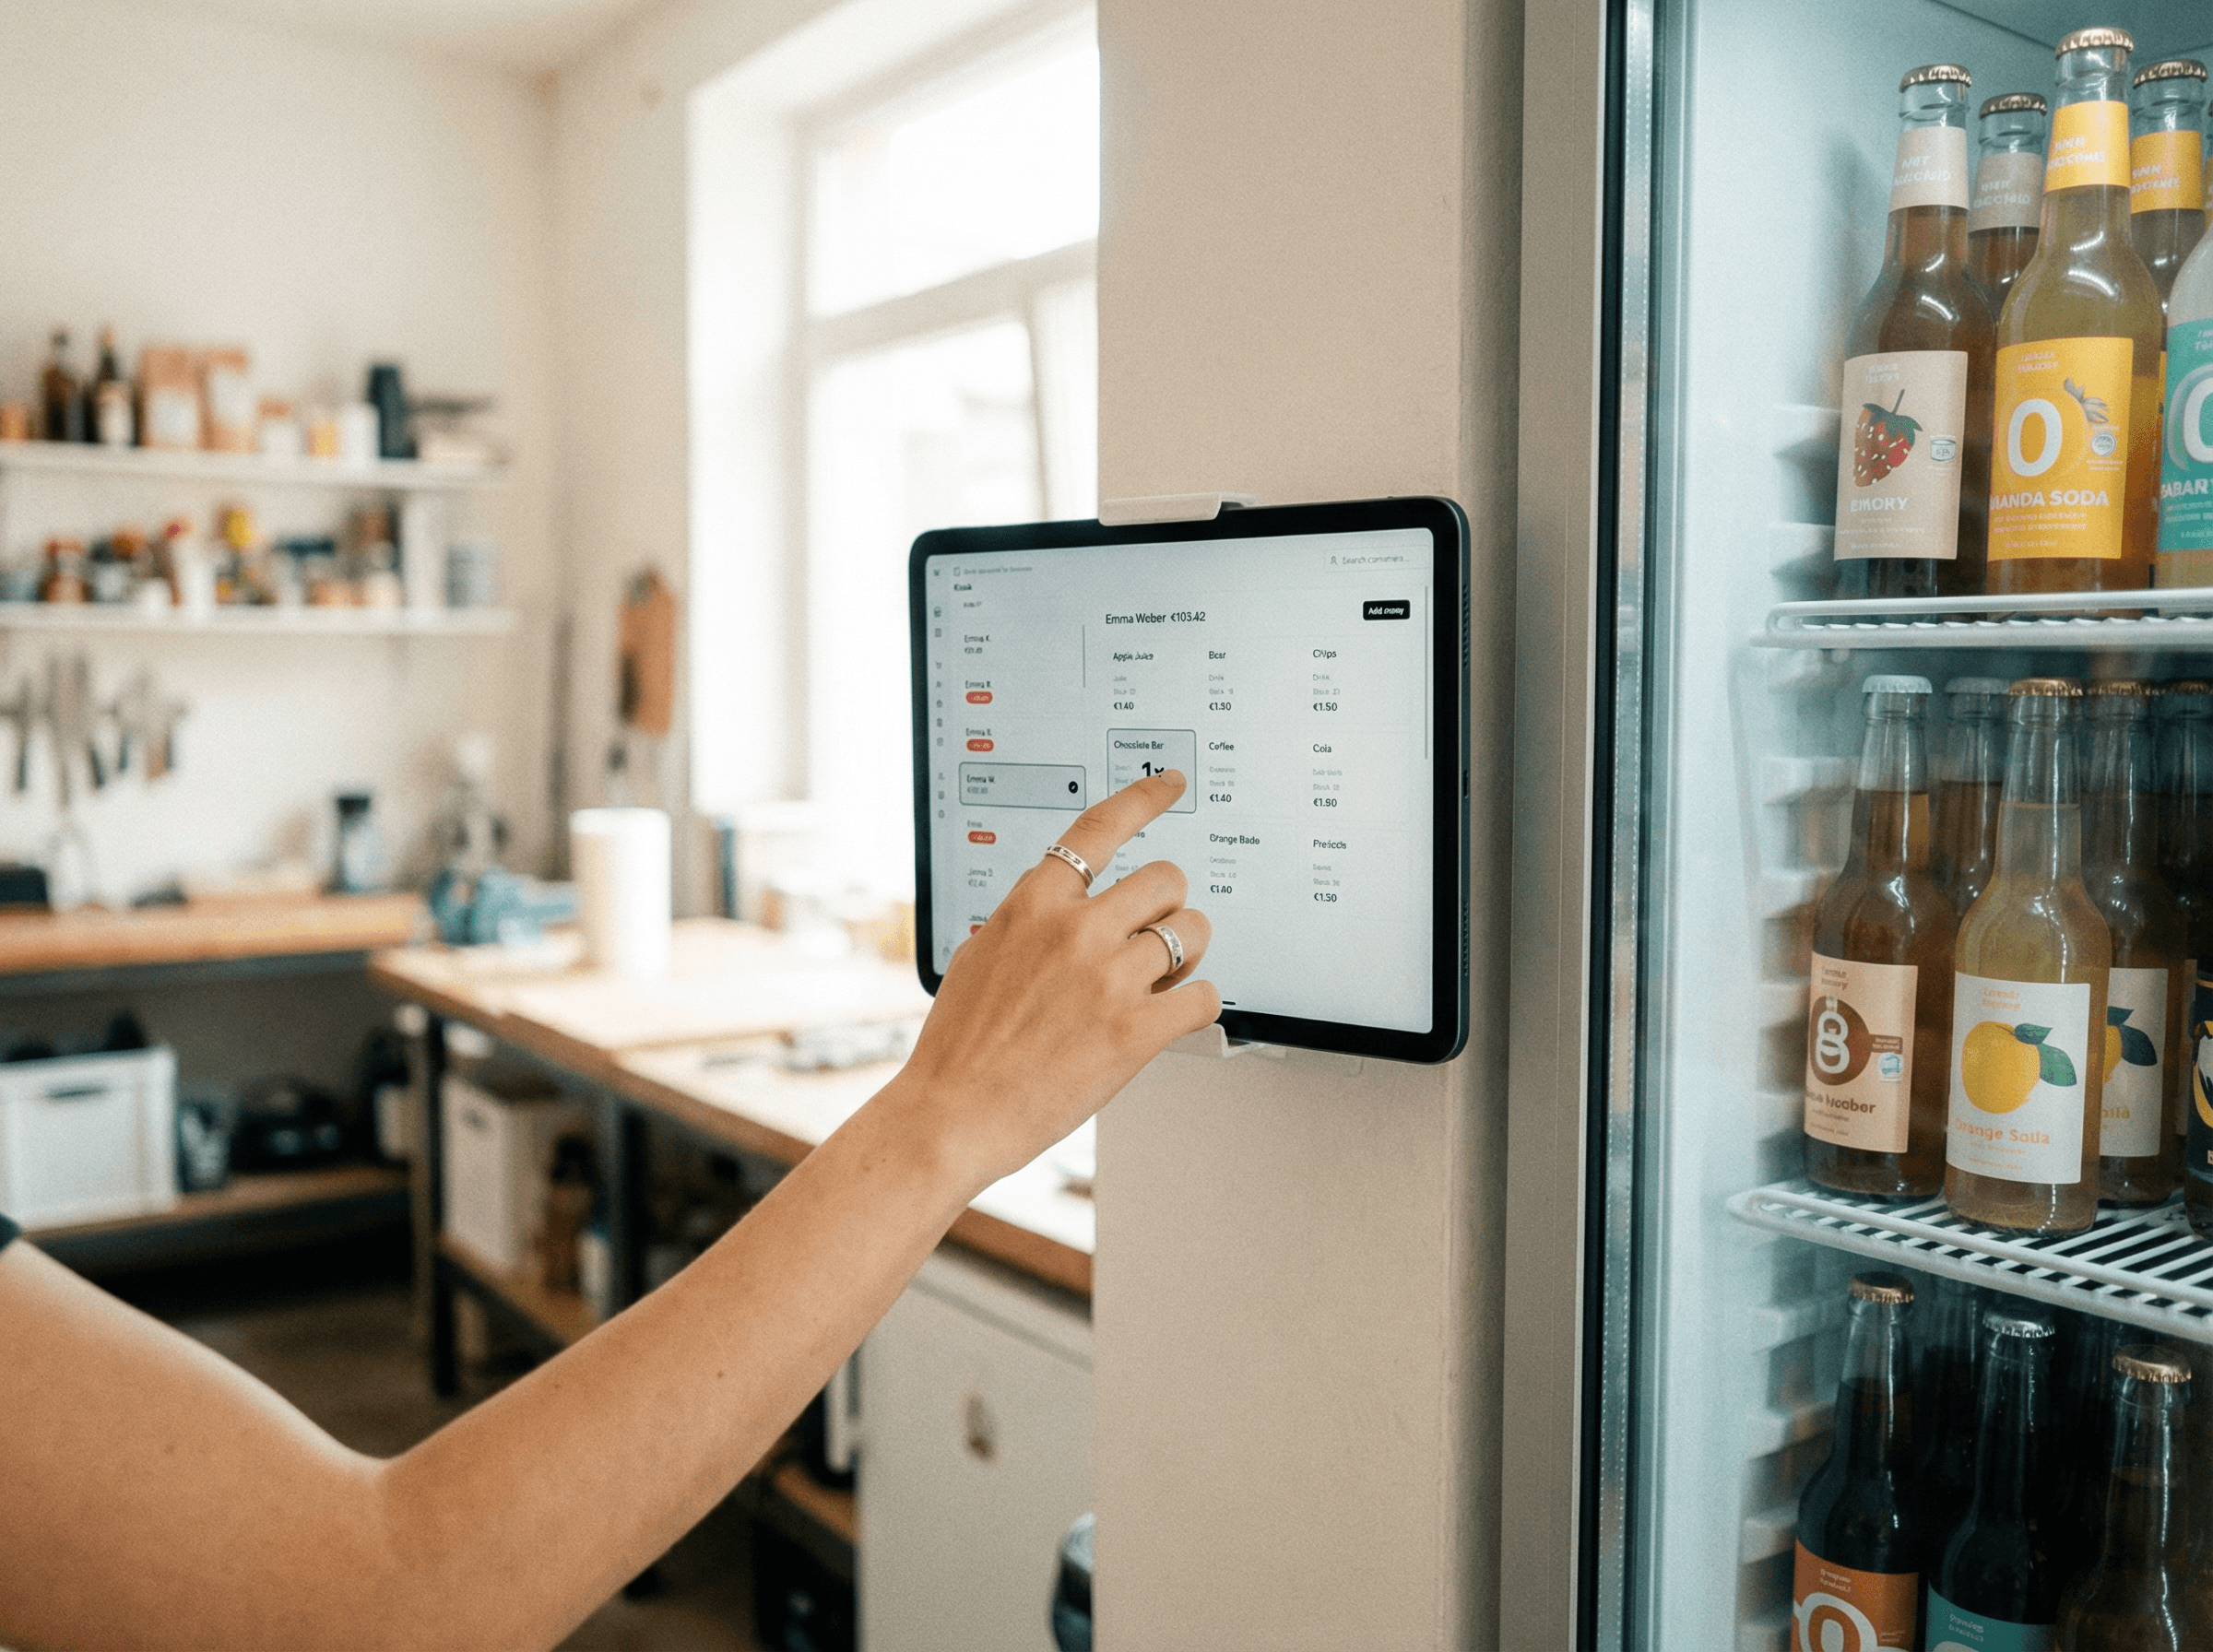
Open the browser on the tablet (Safari on iPad, Chrome on Android) and go to tapper.team/home. Log in with the kiosk account you just created.
You'll now see the kiosk screen: the member list and the products. That's exactly what your colleagues or club members will see later.
2.2 Add Tapper to the home screen
So that Tapper feels like a real app and can be opened with a single tap:
On iPad (Safari):
- Tap the share icon (square with upward arrow)
- Select "Add to Home Screen"
- Confirm
On Android (Chrome):
- Tap the three dots in the top right
- Select "Add to Home Screen"
- Confirm
Tapper now appears as an icon on the home screen and opens like an app — no address bar, no browser tabs.
Step 3: Enable Kiosk Mode (Optional, but Recommended)
This is the step many people skip — and then regret two weeks later because someone accidentally navigated away and opened YouTube.
Kiosk mode locks the tablet to a single app or website. The device can then no longer be easily exited, other apps opened, or settings changed.
On iPad: Guided Access
The iPad has a built-in function for this:
- Go to Settings → Accessibility → Guided Access
- Turn on "Guided Access"
- Set a passcode that only you know
- Open Tapper
- Triple-tap the side button (or Home button) → "Start Guided Access"
From now on, the iPad stays on Tapper. Exiting requires your passcode.
On Android: Screen Pinning
Android has a similar feature:
- Go to Settings → Security → Screen Pinning (the exact name varies by manufacturer)
- Enable the feature
- Open Tapper
- Open the app overview and tap the pin icon on Tapper
The device is now pinned to Tapper.
Alternative: Kiosk App from the App Store
If you want more control — e.g., automatic launch after restart, screen timeout after inactivity, or centralized management of multiple tablets — there are various kiosk apps in the App Store and Google Play Store. Just search for "Kiosk Browser" or "Kiosk Mode"; most have a free basic version.
Step 4: Mount or Place the Tablet
Now comes the physical part — and it's actually the easiest.
Option A: Wall mount
This is the cleanest setup. A tablet wall mount costs between $10 and $30 and can be attached with two screws. Next to the fridge or storage area is the ideal location — right where products are taken from.
Advantage: the tablet is always visible, always accessible, always charged (if you can run a long charging cable to it).
Option B: Desk stand
If wall mounting isn't possible or desired, a simple tablet stand works too. Important: position it so it can't fall over and is easy to reach.
Don't forget a charging cable: A permanently connected charging cable ensures the tablet never runs out of power. With wall mounting, the cable can often be routed behind the mount or along the wall.
Step 5: Quick Explanation — and You're Off
The most time-consuming part of the whole process: briefly explaining to people how it works. But really just briefly.
Usage is so intuitive that a short introduction is enough:
- Tap your name
- Tap a product
- Done
If you like, hang a small note next to it. Anyone who knew how to use a tally sheet will understand Tapper immediately.
What Happens Automatically After That
Once the system is running, it keeps running. No further intervention needed.
- Purchases are automatically assigned to the correct accounts
- Stock levels decrease with each booking
- Members with low balances see a reminder
- You can see in the admin dashboard at any time how much each person has consumed and when to reorder
Once set up, Tapper handles the administrative work in the background — and you no longer have to think about the drink fund.
Frequently Asked Questions
What does a suitable tablet cost? For this purpose, an inexpensive Android tablet starting at around $50–100 is sufficient. It doesn't need to be the latest model — Wi-Fi, a current browser, and a reasonably responsive touchscreen are enough.
What happens if the Wi-Fi goes down? Tapper requires an internet connection. For brief outages, you can bridge the gap with a smartphone hotspot or log purchases directly on your own phone. For most environments, this isn't a relevant problem.
Can the tablet be used for other things? Technically yes, but it's recommended to use the device exclusively for Tapper. A dedicated tablet costs little and eliminates the question "who installed what on it."
What if someone needs more accounts or products? Tapper is free to test for up to 3 members. For larger teams, there are affordable plans starting from 50 member slots. Upgrade at any time, no long-term contracts.
Conclusion: Set It Up Once, Stay Relaxed Permanently
Setting up a tablet as a point-of-sale system sounds like more than it is. Within an hour — including mounting — everything is done. After that, the system runs on its own, and you no longer need to worry about the drink fund.
No more chaos, no more illegible lists, no more manual monthly settlement.